
概述
在java.util.concurrent.locks.Lock详解一文中简单的描述了JDK中JUC包对于Lock接口的定义,并且简单的对比了Lock接口及Java关键字synchronized的异同。本文主要研究Lock接口的常用实现ReentrantLock,本文主要分为以下几部分:
什么是重入?
ReentrantLock通过类名称可顾名思义,由Reentrant及Lock两部分组成。Lock略去不谈,观察Reentrant单词可以简单将其拆为前缀re及主体entrant,即re:再,entrant:进入。
显而易见重入就是再次进入的意思,在并发编程中具体指某线程已经获取了一个锁后,再次请求这个锁时可以获得该锁而不会阻塞。
具体示例
在某线程递归调用某函数时较容易观察重入锁与非重入锁区别,如以下代码:1
2
3
4
5
6
7
8
9
10
11
12
13
14
15
16
17
18
19
20
21public class ReentrantLockTest {
private volatile int i = 20;
public synchronized void callBack() {
if (i > 0) {
i--;
System.out.println(Thread.currentThread().getName() + ":" + i);
callBack();
}
else{
//将i重置
i = 20;
}
}
public static void main(String[] args) {
ReentrantLockTest reentrantLockTest = new ReentrantLockTest();
reentrantLockTest.callBack();
}
}
callBack函数使用synchronized关键字进行同步控制,synchronized关键字可以确保同时只有一个线程可进入临界区,并且由于synchronized支持重入,故上面的代码可以正常运行(synchronized关键字实现原理以后再做补充)。
简单非重入锁
现为Lock接口编写一个简单实现:1
2
3
4
5
6
7
8
9
10
11
12
13
14
15
16
17
18
19
20
21
22
23
24
25
26
27
28
29
30
31public class BlueRhinoLock implements Lock {
private BlockingQueue<Object> blockingQueue = new LinkedBlockingQueue<Object>(1);
public BlueRhinoLock() {
try {
this.blockingQueue.put(new Object());
} catch (InterruptedException e) {
e.printStackTrace();
}
}
public void lock() {
try {
blockingQueue.take();
} catch (InterruptedException e) {
e.printStackTrace();
}
}
public void unlock() {
try {
blockingQueue.put(new Object());
} catch (InterruptedException e) {
e.printStackTrace();
}
}
//其他接口函数略
}
简单起见,该锁基于BlockingQueue将capacity取值为1,实现了一个不可重入的排它锁。如以下代码:1
2
3
4
5
6
7
8
9
10
11
12
13
14
15
16
17
18
19
20
21
22
23
24public class ReentrantLockTest {
private volatile int i = 5;
BlueRhinoLock blueRhinoLock = new BlueRhinoLock();
public void callBack() {
blueRhinoLock.lock();
if (i > 0) {
i--;
System.out.println(Thread.currentThread().getName() + ":" + i);
callBack();
}else{
i = 5;
}
blueRhinoLock.unlock();
}
public static void main(String[] args) {
ReentrantLockTest reentrantLockTest = new ReentrantLockTest();
for(int i =0 ;i<2;i++){
new Thread(() -> reentrantLockTest.callBack()).start();
}
}
}
此段代码不使用synchronized关键字而使用BlueRhinoLock进行同步控制,在任一线程运行到blueRhinoLock.lock();
语句后获取锁,则所有其他线程需要在此等待。但由于本段代码中存在回调,同一线程会在回调callBack时再次运行到blueRhinoLock.lock();
代码行时则由于无法获取锁进入等待,则形成由于锁不支持重入而形成死锁。运行结果为:1
2Thread-0:4
//无法继续打印
简单重入锁
为了解决以上死锁问题,需要对以上的简单锁进行改进使其支持重入。主要需要完成对于同一线程请求锁时,若当前线程已经拥有当前锁且没有释放的情况下,直接继续执行,根据以上思路配合使用ThreadLocall可以将代码修改为:1
2
3
4
5
6
7
8
9
10
11
12
13
14
15
16
17
18
19
20
21
22
23
24
25
26
27
28
29
30
31
32
33
34
35
36
37
38
39public static class BlueRhinoReentrantLock implements Lock {
private BlockingQueue<Object> blockingQueue = new LinkedBlockingQueue<Object>(1);
private ThreadLocal<Object> threadLocal = new ThreadLocal<>();
public BlueRhinoReentrantLock() {
try {
this.blockingQueue.put(new Object());
} catch (InterruptedException e) {
e.printStackTrace();
}
}
public void lock() {
if(threadLocal.get() != null){
return ;
}
try {
Object o = blockingQueue.take();
threadLocal.set(o);
} catch (InterruptedException e) {
e.printStackTrace();
}
}
public void unlock() {
Object o = threadLocal.get();
if(o == null){
return;
}
try {
blockingQueue.put(o);
} catch (InterruptedException e) {
e.printStackTrace();
}
}
}
注意以上为测试代码,没有充分考虑安全性问题
以上代码使用ThreadLocal记录当前线程是否已经获取锁,解决了重入问题。调用代码为:1
2
3
4
5
6
7
8
9
10
11
12
13
14
15
16
17
18
19
20
21
22
23
24public class ReentrantLockTest {
private volatile int i = 5;
BlueRhinoReentrantLock blueRhinoLock = new BlueRhinoReentrantLock();
public void callBack() {
blueRhinoLock.lock();
if (i > 0) {
i--;
System.out.println(Thread.currentThread().getName() + ":" + i);
callBack();
}else{
i = 5;
}
blueRhinoLock.unlock();
}
public static void main(String[] args) {
ReentrantLockTest reentrantLockTest = new ReentrantLockTest();
for(int i =0 ;i<2;i++){
new Thread(() -> reentrantLockTest.callBack()).start();
}
}
}
运行结果为:1
2
3
4
5
6
7
8
9
10Thread-0:4
Thread-0:3
Thread-0:2
Thread-0:1
Thread-0:0
Thread-1:4
Thread-1:3
Thread-1:2
Thread-1:1
Thread-1:0
ReentrantLock的实现分析
总览
以上代码简单演示了重入锁与非重入锁的区别,但是代码实现非常粗糙,本节主要深入到JDK8中ReentrantLock类的实现,学习生产级别的代码如何实现重入锁。
JDK8中ReentrantLock代码包括注释为763行,作者为大神Doug Lea。其UML图为:
通过UML可以看出与ReentrantLock与其相关类(接口)之间的重要关系:
- ReentrantLock实现了Lock接口(应该说是废话);
- 抽象类Sync是ReentrantLock重要组成部分;
- FairSync及NonFairSync均继承于Sync;
- Sync继承抽象类了AbstractQueuedSynchronizer;
- AbstractQueuedSynchronizer继承了抽象类AbstractOwnableSynchronizer。
下文从一些重要的函数入手开始研究其实现。
重要函数
构造函数
ReentrantLock只有两个构造函数1
2
3
4
5
6
7public ReentrantLock() {
sync = new NonfairSync();
}
public ReentrantLock(boolean fair) {
sync = fair ? new FairSync() : new NonfairSync();
}
构造函数均比较简单,都创建了一个Sync类型的实例变量,由于Sync是抽象类,实际创建的为其子类,默认为NonfairSync,在带boolean参数的构造函数中可以使用参数值指定创建NonfairSync或FairSync对象。源码中对于Sync的介绍为:
Base of synchronization control for this lock. Subclassed into fair and nonfair versions below. Uses AQS state to represent the number of holds on the lock.
重点在于使用AQS(AbstractQueuedSynchronizer)记录锁的获取数量,由此可见AbstractQueuedSynchronizer为ReentrantLock实现提供了重要支持。在前面的文章深入AQS介绍了AQS相关技术。
lock函数
lock函数为Lock接口的核心函数之一,在Lock接口中对于该函数的注释为:
Acquires the lock.
If the lock is not available then the current thread becomes disabled for thread scheduling purposes and lies dormant until the lock has been acquired.
在ReentrantLock的实现中对于Lock函数也有注释:
Acquires the lock.
Acquires the lock if it is not held by another thread and returns immediately, setting the lock hold count to one.
If the current thread already holds the lock then the hold count is incremented by one and the method returns immediately.
If the lock is held by another thread then the current thread becomes disabled for thread scheduling purposes and lies dormant until the lock has been acquired, at which time the lock hold count is set to one.
对比两段注释可见,都表明该函数主要功能为“获取锁”。
在Lock接口中仅仅规定如果当前线程无法获取锁则进入无法调度的休眠状态直到获得锁。
在ReentrantLock实现时细化了其实现细节,说明在当前线程获得锁后,将其锁计数器置为1,以后持有该锁的线程再次申请锁则将计数器加1并且立即返回,如当前线程无法获取锁则进入无法调度的休眠状态直道获取锁,并且在获取锁的同时将锁计数器置为1。现在具体看实现代码:1
2
3public void lock() {
sync.lock();
}
可见直接调用了sync的lock函数,再进入lock函数进行研究。1
abstract void lock();
sync的lock函数是一个抽象函数,在两个子类NonfairSync、FairSync中进行了不同实现,上一节构造函数中已经看见过这两个类了,分别代表非公平算法实现的同步器及公平算法实现的同步器,无参数构造函数默认创建的是非公平的同步器。
NonfairSync中的lock
先考察NonfairSync中的lock函数:1
2
3
4
5
6final void lock() {
if (compareAndSetState(0, 1))
setExclusiveOwnerThread(Thread.currentThread());
else
acquire(1);
}
进入函数首先使用compareAndSetState函数进行设置,该函数实际是从AbstractQueuedSynchronizer类继承而来,其功能为使用CAS操作原子的设置对象中一个名为state的int型变量。
如果实际值与期望值相等均为0,说明当前锁没有被持有,则直接将state设置为1,继续调用setExclusiveOwnerThread函数将当前锁的所有者设置为当前线程。
如果实际值与期望值0不相等则说明当前锁已经被别的线程获取,需要使用acquire函数进行锁的获取,该函数仍然是从AbstractQueuedSynchronizer类继承而来其过程如下:
根据流程图继续进行分析,进入acquire函数首先调用tryAcquire再次尝试获取锁,这是因为在线程从使用compareAndSetState设置state失败到当前时刻,原来占用锁的的线程可能已经释放了锁,如果这次尝试成功可以较大的减少将线程加入等待队列的性能消耗。根据前文深入AQS的介绍,tryAcquire函数是AQS类的成员函数,使用继承AQS类的方式实现同步器时需要在子类覆盖tryAcquire方法。在ReentrantLock中对于tryAcquire调用会根据当前锁是否公平锁,而最终调用NonfairSync或FairSync对象的tryAcquire方法。
由于本处分析NonfairSync的lock函数,则继续查看NonfairSync的tryAcquire函数:1
2
3protected final boolean tryAcquire(int acquires) {
return nonfairTryAcquire(acquires);
}
其最终调用nonfairTryAcquire函数:1
2
3
4
5
6
7
8
9
10
11
12
13
14
15
16
17
18final boolean nonfairTryAcquire(int acquires) {
final Thread current = Thread.currentThread();
int c = getState();
if (c == 0) {
if (compareAndSetState(0, acquires)) {
setExclusiveOwnerThread(current);
return true;
}
}
else if (current == getExclusiveOwnerThread()) {
int nextc = c + acquires;
if (nextc < 0) // overflow
throw new Error("Maximum lock count exceeded");
setState(nextc);
return true;
}
return false;
}
该函数主要完成如下逻辑:
- 获取当前线程对象及当前锁的状态值;
- 如果当前锁的状态值为0,则说明当前没有线程获取锁,使用CAS方式设置锁的状态为acquires(根据上文参数,此处为1);如果不为0说明已有线程获取了锁,直接跳转到第5步;
- 如果设置成功,说明获取锁成功,则直接将当前锁的排他所有者线程设置为当前线程(由于第二步CAS设置只可能有一个线程成功,此处代码不需要作临界区保护);
- 如果设置不成功,说明同一时刻有其他线程调用
compareAndSetState,并且获得成功,则当前线程竞争锁失败直接返回false; - 当前状态值不为0,需要继续判断以获取锁的线程是不是当前线程:
- 如果是,说明当前是同一线程重入的获取锁,则将当前锁状态加acquires(根据上文参数,此处为1),之后锁状态如果溢出,抛出异常,否则将锁的状态设置为新的值,返回true;
- 如果不是,尝试获取锁失败,直接返回false
以上第5.1步逻辑是实现重入的关键代码。
完成tryAcquire调用后,如果获取锁失败,则将当前线程封装为等待节点加入等待队列中。后续详细操作主要由AQS完成,可参考深入AQS。
FairSync中的lock
继续研究FairSync中的lock1
2
3final void lock() {
acquire(1);
}
为方便比较将NonfairSync的lock拷贝下来:1
2
3
4
5
6final void lock() {
if (compareAndSetState(0, 1))
setExclusiveOwnerThread(Thread.currentThread());
else
acquire(1);
}
对比代码可见公平锁实现较非公平锁简单,其直接调用acquire函数,第一次放弃插队的机会。而acquire函数如上文分析,最开始会调用FairSync类实现的tryAcquire函数,其代码如下:1
2
3
4
5
6
7
8
9
10
11
12
13
14
15
16
17
18
19protected final boolean tryAcquire(int acquires) {
final Thread current = Thread.currentThread();
int c = getState();
if (c == 0) {
if (!hasQueuedPredecessors() &&
compareAndSetState(0, acquires)) {
setExclusiveOwnerThread(current);
return true;
}
}
else if (current == getExclusiveOwnerThread()) {
int nextc = c + acquires;
if (nextc < 0)
throw new Error("Maximum lock count exceeded");
setState(nextc);
return true;
}
return false;
}
对比非公平锁代码,其实现最大逻辑区别在于第五行,公平锁实现时,在当前锁没有被其他线程获取时,会判断当前等待队列是否有等待锁的线程,如果没有才会获取锁,否则直接返回失败,在此处第二次放弃插队机会,由此保证线程获取锁的顺序一定与申请锁的等待时间相同。
lockInterruptibly函数
lockInterruptibly函数是前文lock函数的可中断版本,查看源代码1
2
3public void lockInterruptibly() throws InterruptedException {
sync.acquireInterruptibly(1);
}
该函数通过调用AQS类的acquireInterruptibly函数实现,继续查看源码:1
2
3
4
5
6
7public final void acquireInterruptibly(int arg)
throws InterruptedException {
if (Thread.interrupted())
throw new InterruptedException();
if (!tryAcquire(arg))
doAcquireInterruptibly(arg);
}
该函数实现逻辑与lock函数调用的AQS类的lock函数基本相同,主要增加了对线程中断的判断。进入函数首先判断当前线程是否已经中断,中断后则直接抛出中断异常,停止获取锁。如果没有被中断,则调用tryAcquire尝试获取锁,如果获取锁失败则进入doAcquireInterruptibly函数,该函数代码如下:1
2
3
4
5
6
7
8
9
10
11
12
13
14
15
16
17
18
19
20
21
22private void doAcquireInterruptibly(int arg)
throws InterruptedException {
final Node node = addWaiter(Node.EXCLUSIVE);
boolean failed = true;
try {
for (;;) {
final Node p = node.predecessor();
if (p == head && tryAcquire(arg)) {
setHead(node);
p.next = null; // help GC
failed = false;
return;
}
if (shouldParkAfterFailedAcquire(p, node) &&
parkAndCheckInterrupt())
throw new InterruptedException();
}
} finally {
if (failed)
cancelAcquire(node);
}
}
对比lock函数调用的acquireQueued函数,主要区别在于第16行,如果在阻塞过程中被中断直接抛出中断异常到上层函数,并且取消当前等待节点。
tryLock函数
tryLock函数尝试获取锁,与lock函数不同在于,该函数不阻塞,如果函数锁成功则返回true,否则直接返回false。
tryLock(long timeout, TimeUnit unit)函数
该函数与lock函数逻辑相似,主要区别在于调用LockSupport工具类时使用parkNanos函数,指定等待时间。该函数在获取到锁或者达到过期时间时返回,获取锁则返回true,否则返回false。
unlock函数
unlock函数用于释放锁,其调用syn.release函数,代码在AQS中实现:1
2
3
4
5
6
7
8
9public final boolean release(int arg) {
if (tryRelease(arg)) {
Node h = head;
if (h != null && h.waitStatus != 0)
unparkSuccessor(h);
return true;
}
return false;
}
其逻辑为调用tryRelease函数释放锁,在释放成功后唤醒当前头结点的后续等待节点。tryRelease在AQS中没有具体实现,在ReentrantLock类的内部工具类Syn中实现,代码为:1
2
3
4
5
6
7
8
9
10
11
12protected final boolean tryRelease(int releases) {
int c = getState() - releases;
if (Thread.currentThread() != getExclusiveOwnerThread())
throw new IllegalMonitorStateException();
boolean free = false;
if (c == 0) {
free = true;
setExclusiveOwnerThread(null);
}
setState(c);
return free;
}
逻辑为:
- 获取当前加锁状态,并将其减少releases(此处为1);
- 判断当前线程是否是获取锁的线程,如果当前线程没有获取锁则直接抛出异常;
- 若没有异常则需判断当前的加锁状态是否为0,此步与每次重入加锁状态加1对应,如果当前加锁状态已经为0,表示当前线程已经释放锁,则重新设置锁的持有线程为空,返回
true,上文release函数不唤醒后续节点; - 若加锁状态不为0,则更新加锁状态,返回
false,上文release函数不唤醒后续节点。
newCondition函数
该函数用于返回一个Condition接口实例,该类在AQS中有相关实现ConditionObject,由于ConditionObject为AQS非静态内部类,故通过调用newCondition函数创建的Condition接口实例会与当前的AQS对象自动关联起来(此处可参考非静态内部类特点)。对于Condition接口下一节再详细介绍。
Condition对象介绍
Condition接口主要用于多线程加锁环境下,不同线程之间的协作。提供的核心方法为await及signal,语义为等待和通知。参考使用代码为:1
2
3
4
5
6
7
8
9
10
11
12
13
14
15
16
17
18
19
20
21
22
23
24
25
26
27
28
29
30
31
32
33
34
35
36
37class BoundedBuffer {
final Lock lock = new ReentrantLock();
final Condition notFull = lock.newCondition();
final Condition notEmpty = lock.newCondition();
final Object[] items = new Object[100];
int putptr, takeptr, count;
public void put(Object x) throws InterruptedException {
lock.lock();
try {
while (count == items.length)
notFull.await();
items[putptr] = x;
if (++putptr == items.length) putptr = 0;
++count;
notEmpty.signal();
} finally {
lock.unlock();
}
}
public Object take() throws InterruptedException {
lock.lock();
try {
while (count == 0)
notEmpty.await();
Object x = items[takeptr];
if (++takeptr == items.length) takeptr = 0;
--count;
notFull.signal();
return x;
} finally {
lock.unlock();
}
}
}
以上代码引用自JDK8的Condition注释,实现了一个简单的有界缓存。主要包括存和取两个函数,由于可能使用与多线程环境,类中定义了一个重入锁进行对象属性的包括,保证同一时刻最多仅有一个线程可对有界缓存进行操作。但在缓存使用过程中,可能出现存入对象时有界队列已满,或取对象时队列还是空这两种情况。
当缓存在插入对象时,如队列已满则阻塞等待缓存有空间后继续插入;在读取对象时,如缓存为空则阻塞等待直到缓存有新的元素插入。
为实现以上功能,该段代码使用了使用lock.newCondition()创建notFull,notEmpty两个Condition对象,分别表示当前缓存非满和非空,在线程满时调用notFull.await()阻塞等待,直到缓存有空间后调用notFull.signal()唤醒等待线程,notEmpty用法类似。
那Condition对象是如何完成以上功能?与Object提供的wait及notify函数又有何区别?
Condition对象实现
通过以上示例可以学习到Condition接口的两个主要函数的用法,现在通过观察其代码实现学习具体实现逻辑。
await函数实现
本处查看AQS类中Condition接口的实现类ConditionObject中await函数的实现代码:1
2
3
4
5
6
7
8
9
10
11
12
13
14
15
16
17
18public final void await() throws InterruptedException {
if (Thread.interrupted())
throw new InterruptedException();
Node node = addConditionWaiter();
int savedState = fullyRelease(node);
int interruptMode = 0;
while (!isOnSyncQueue(node)) {
LockSupport.park(this);
if ((interruptMode = checkInterruptWhileWaiting(node)) != 0)
break;
}
if (acquireQueued(node, savedState) && interruptMode != THROW_IE)
interruptMode = REINTERRUPT;
if (node.nextWaiter != null) // clean up if cancelled
unlinkCancelledWaiters();
if (interruptMode != 0)
reportInterruptAfterWait(interruptMode);
}
通过以上代码发现该函数主要逻辑为: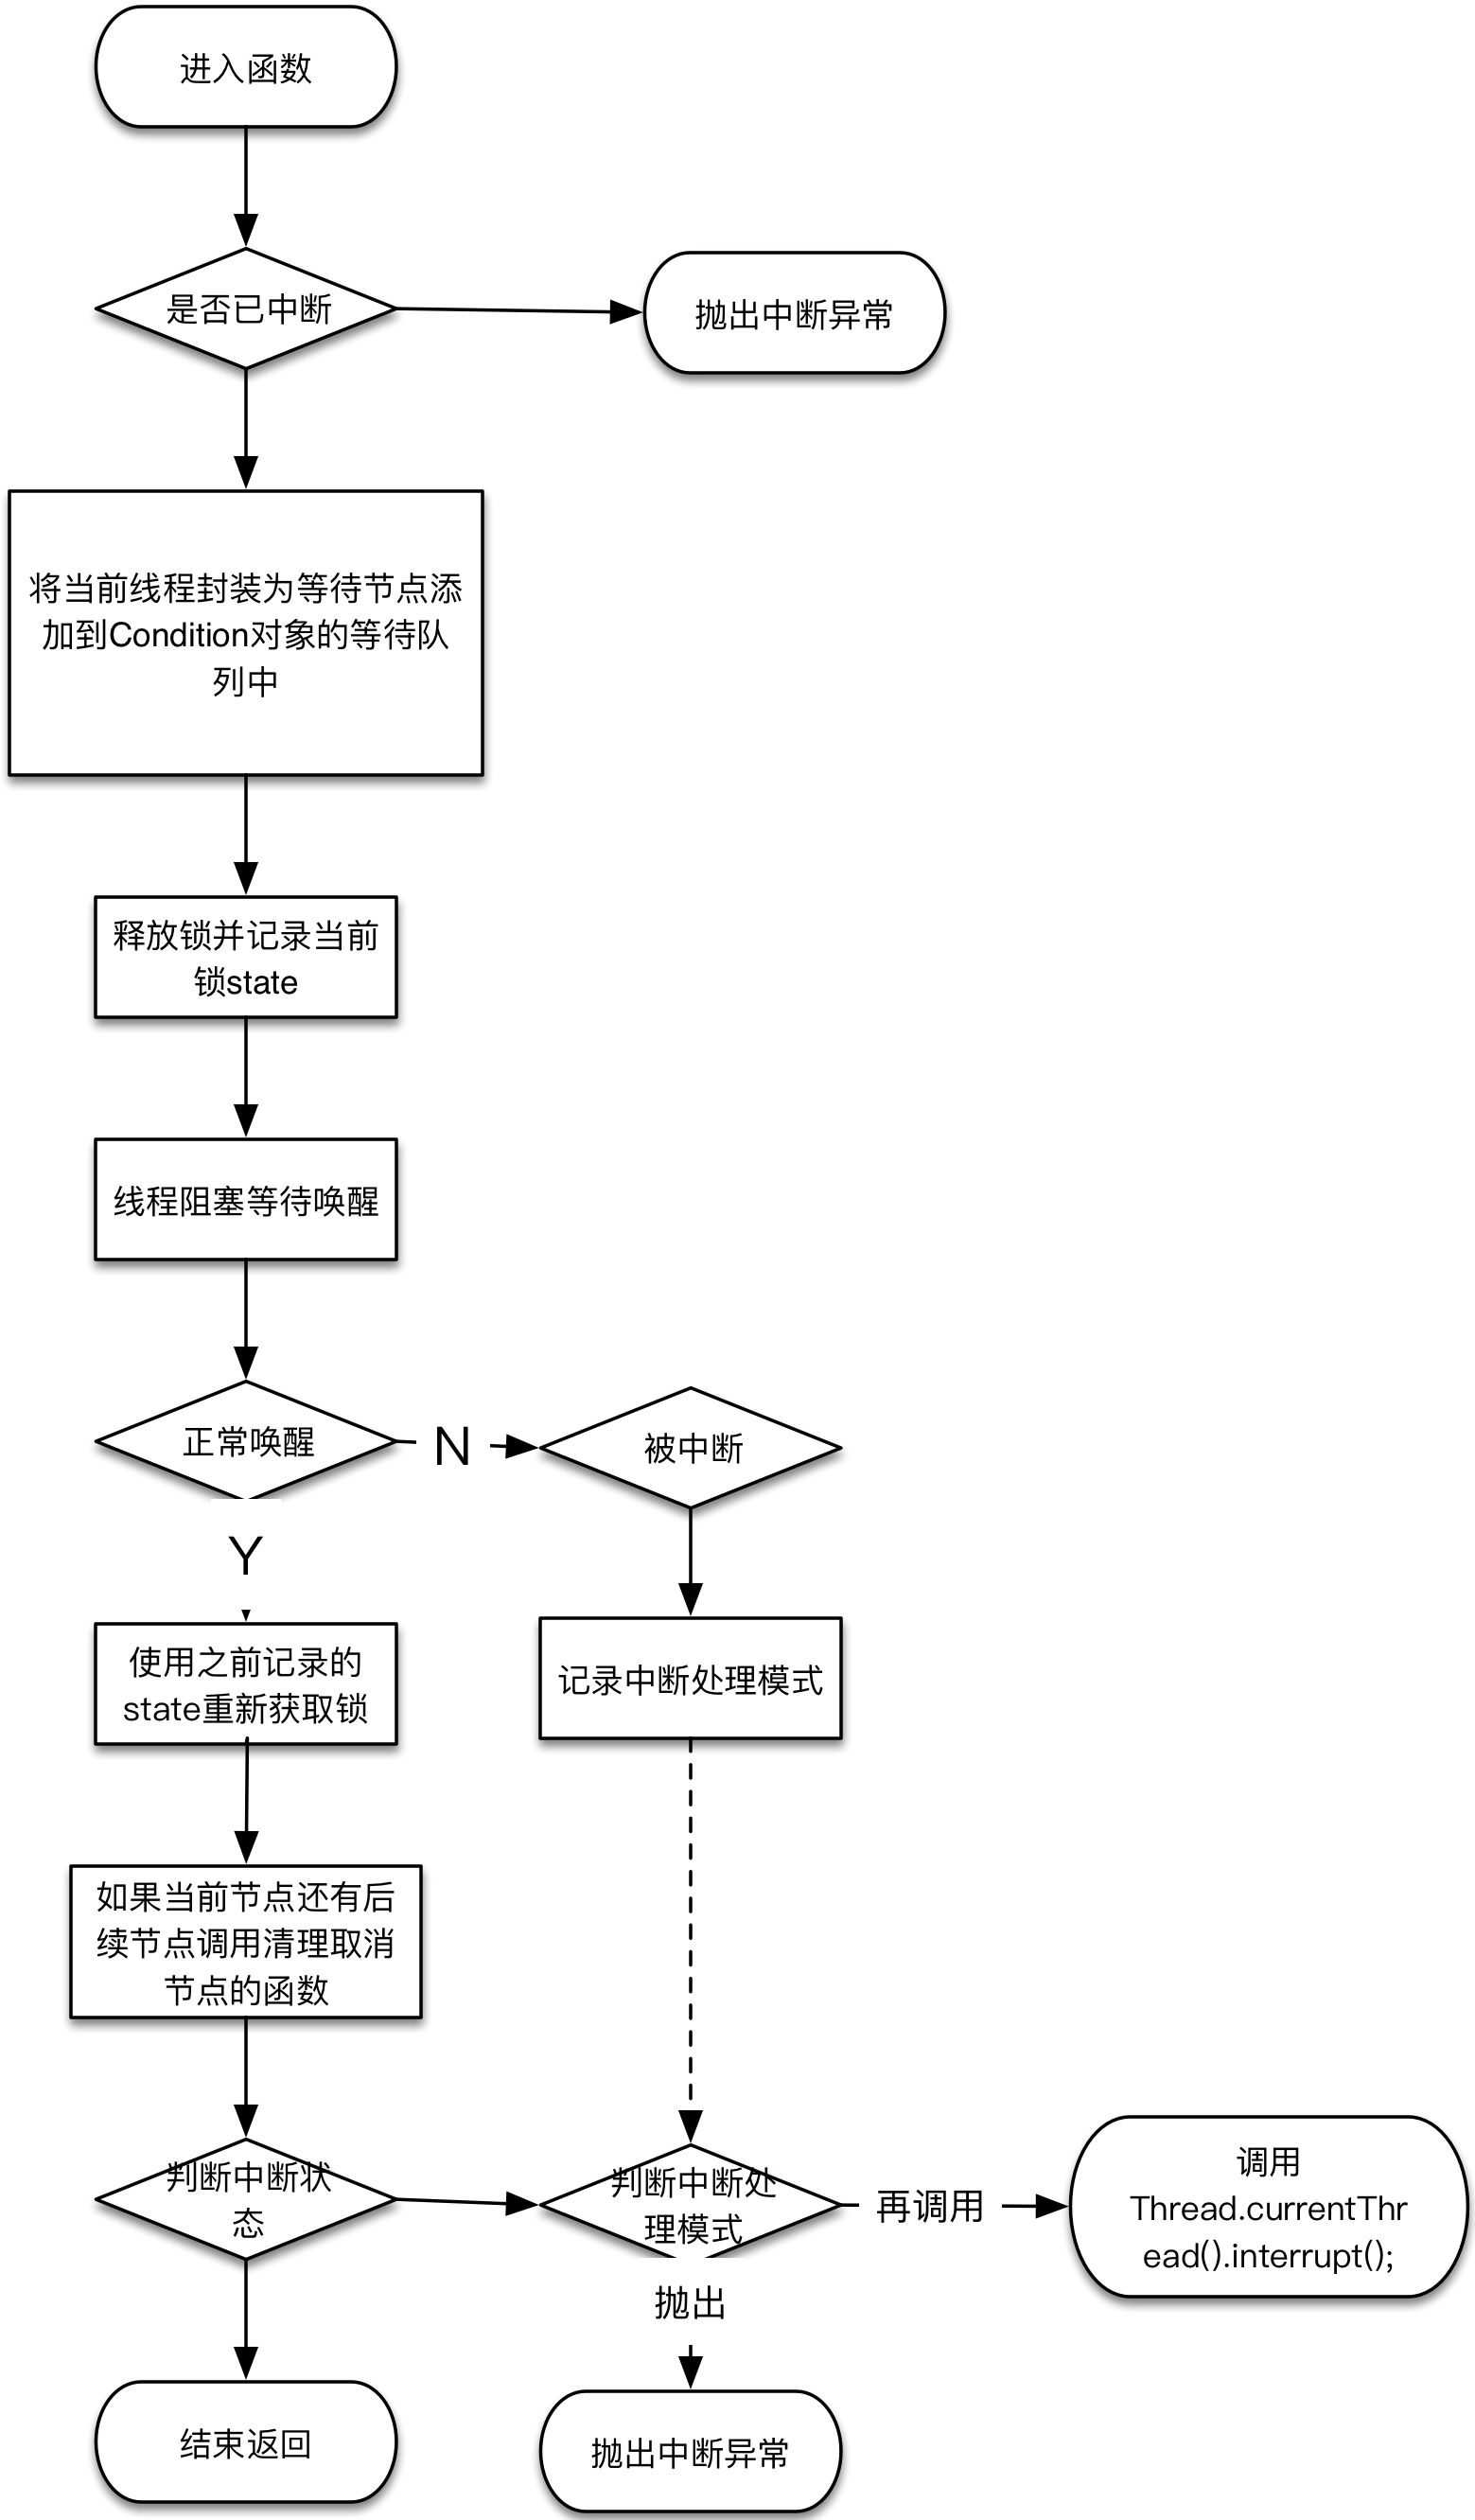
其中释放锁时相当于将当前节点从AQS的头节点移除。
使用await需要注意需要在当前线程获取锁后再调用,否则在释放锁时会抛出IllegalMonitorStateException异常,且在增加等待队列时会调用unlinkCancelledWaiters函数,该函数并不是线程安全的,这也要求调用该函数时需要首先获取锁。
另外在中断方面可以发现如果在Condition对象的等待队列中被中断,当前等待节点会从Condition对象的等待队列中被移除,但是仍然会将自己添加到AQS的等待队列中继续尝试获取锁。所以调用await函数后,即使等待线程被中断也不会立即抛出中断异常,仍然需要等到其获取到锁后才能根据不同中断处理模式进行中断处理。
signal函数实现
此处仍然查看AQS类中ConditionObject中signal的实现代码1
2
3
4
5
6
7public final void signal() {
if (!isHeldExclusively())
throw new IllegalMonitorStateException();
Node first = firstWaiter;
if (first != null)
doSignal(first);
}
代码首先调用isHeldExclusively函数判断当前线程是否排他的持有当前锁,如果不存在则直接抛出IllegalMonitorStateException异常。如果持有锁则调用doSignal函数:1
2
3
4
5
6
7
8private void doSignal(Node first) {
do {
if ( (firstWaiter = first.nextWaiter) == null)
lastWaiter = null;
first.nextWaiter = null;
} while (!transferForSignal(first) &&
(first = firstWaiter) != null);
}
此段代码逻辑也比较简单,首先将ConditionObject的等待节点的头结点设置为待转移节点的后续节点,调用transferForSignal方法将待转移节点附到AQS等待队列的队尾。这里需要注意的是transferForSignal函数的实现:1
2
3
4
5
6
7
8
9
10
11
12
13
14
15
16
17
18
19final boolean transferForSignal(Node node) {
/*
* If cannot change waitStatus, the node has been cancelled.
*/
if (!compareAndSetWaitStatus(node, Node.CONDITION, 0))
return false;
/*
* Splice onto queue and try to set waitStatus of predecessor to
* indicate that thread is (probably) waiting. If cancelled or
* attempt to set waitStatus fails, wake up to resync (in which
* case the waitStatus can be transiently and harmlessly wrong).
*/
Node p = enq(node);
int ws = p.waitStatus;
if (ws > 0 || !compareAndSetWaitStatus(p, ws, Node.SIGNAL))
LockSupport.unpark(node.thread);
return true;
}
该函数首先将节点状态从Node.CONDITION设置为无状态,如果当前状态不为Node.CONDITION则返回上层函数,继续设置下一个节点。将节点设置为无状态后将其加入AQS等待队列,并且判断前置节点状态,如果前置节点已经被取消,则唤醒当前节点中阻塞的线程。根据Condition实现可知,当前节点阻塞的线程必然在await函数的LockSupport.park(this)行阻塞,如果发现其前驱节点已经取消则直接唤醒该线程,此处需要注意唤醒此线程并不会让该线程直接获取锁,该线程仍然需要等待获取锁。
对于Condition对象的其他函数核心实现逻辑相似,不在赘述。
对比Object的wait及notify函数
根据上文分析Condition类的await及signal函数与Object类的wait及notify功能似乎非常类似,此处进行两种实现的对比。
| 函数名称 | 所属类或接口 | 功能 | 使用条件 |
|---|---|---|---|
| wait | Object | 阻塞等待其他线程调用notify | 需要先使用synchronized获取调用对象的锁 |
| notify | Object | 使被wait阻塞的线程进度调度 | 需要先使用synchronized获取调用对象的锁 |
| await | Condition | 阻塞等待其他线程调用signal | 需要先获取Condition对象关联的锁对象代表的锁 |
| signal | Condition | 使被await阻塞的线程进度调度 | 需要先获取Condition对象关联的锁对象代表的锁 |
直接查看发现以上两种线程间交互方式似乎没有明显不同,但在使用中await及notify方式明细较为灵活,因为一个Lock对象可以创建多个Condition对象用于说明在同一互斥资源上不同的等待条件,如上文BoundedBuffer缓存示例代码,如果使用wait配合synchronized进行实现,则必须同时唤醒插入及读取队列,并且根据判断,总有一个函数需要继续阻塞等待,效率及灵活性都较差。
ReentrantLock性能分析
本文没有针对重入锁性能进行深入测试,参考《Java并发编程实战》一书总结如下:ReentrantLock与内置锁synchronized在JAVA6之后性能差距不大。ReentrantLock锁的公平实现高并发性能明显低于非公平实现,针对代码分析,造成这种原因在于公平锁在高度竞争条件下几乎所有线程都会经过排队及上下文切换(即经过park函数阻塞及unpark函数唤醒),而非公平锁由于可能存在插队的情况,线程上下文切换次数明显少于公平锁,这是是的非公平锁性能更好的主要原因。
ReentrantLock使用场景
ReentrantLock提供比内置锁更灵活的加锁方式,在JCU包中有较多应用。随着synchronized的性能优化,在简单加锁情况下,还是优选synchronized关键字,其使用简单且不需要显示释放,使用出错的几率较低。如果需要灵活的加锁策略(如上文有界缓存示例类)或需要超时机制等可以考虑使用重入锁,当需要尤其注意需要释放锁,推荐在finally代码块中释放锁,保证正常异常情况都能成功释放。
总结
本文在代码层面详细分析了重入锁主要函数实现,ReentrantLock实现了较为灵活的重入锁,对比内置synchronized关键字,不仅提供常规的加锁解锁操作,也提供了非阻塞获取锁及超时时间内获取锁的方法,并且通过Conditon对象提供灵活的线程间通信方式。但其使用比synchronized关键字复杂,且不能自动释放,且随着synchronized关键字性能的提升,故在只需要简单加锁时仍推荐使用synchronized关键字,在需要灵活的加锁策略时考虑使用ReentrantLock